

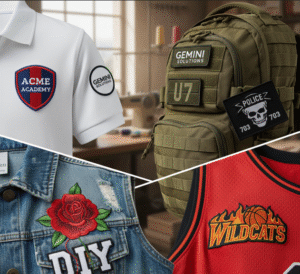
Custom embroidery patches are one of the easiest ways to add identity, style, and branding to clothes, bags, hats, and uniforms. Whether you want patches for your business, sports team, school, or personal clothing, learning how to make your own patches can save money and give you full design control. Let’s start……
What Are Custom Embroidery Patches?
Custom embroidery patches are small pieces of fabric with stitched designs. These designs can be logos, symbols, names, numbers, or artwork. The patch is created separately and then attached to clothing through sewing, ironing, Velcro, or adhesive backing.
They are used in many industries, such as:
- Schools (for uniforms)
- Companies (for staff identity)
- Military and police (for ranks and units)
- Fashion brands
- Sports teams

Today, thousands of brands globally sell clothing decorated with patches because patches are affordable, durable, and look premium.
At Premium Quality Patches, we make custom patches for businesses, creators, and clothing brands, and we also offer digitizing services to convert designs into embroidery-ready files.
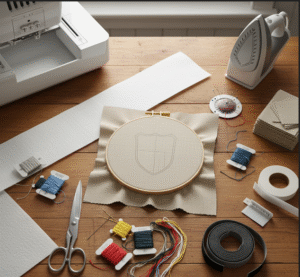
Tools & Materials Needed for Custom Embroidery Patches
Many beginners think they need expensive tools to start. That is the problem. The solution is simple: you only need a few basic items.
Here’s what you need:
Basic Tools:
- Embroidery thread
- Needle (for hand stitching)
- Embroidery machine (optional)
- Embroidery hoop
- Fabric scissors
- Stabilizer (keeps fabric firm)
- Patch fabric (twill or felt works best)
Optional Tools
- Iron
- Heat press
- Cutting machine
- Patch backings (iron-on, Velcro, adhesive)

Step-by-Step Guide to Making Custom Embroidery Patches
Here is the complete step-by-step method. The steps are beginner-friendly and work for both hand embroidery and machine-made patches.
Choose Your Fabric
Twill fabric is the most common material because it is strong and smooth. Felt is also used for softer patches.
Prepare the Design
Before stitching, your design must be digitized, meaning it must be converted into a stitch file.
Digitizing decides:
Stitch type
Stitch direction
Density
Thread changes
If you don’t know how to digitize your designs, Premium Quality Patches can do it for you.
Apply Stabilizer
Place stabilizer under the fabric to stop it from bending or stretching during stitching.
Start Embroidery
Begin stitching your design. If using a machine, load the design into the machine and select thread colors.
Finish the Patch Border
Use a satin stitch or merrowed edge to make a clean border. The border prevents fraying and adds durability.
Cut the Patch Carefully
Use sharp scissors to cut around the design. Keep the border intact.
Apply Patch Backing
Choose a backing such as iron-on, sew-on, adhesive, or Velcro. Attach it based on the type you select.
This process is easy to follow, and as long as you keep the steps simple, your first patch will turn out great.
How to Create the Best Patch Design
A good patch design is simple, readable, and bold. Many beginners make the mistake of adding too many details. This is the agitation stage — complicated designs lead to thin lines that do not stitch well.
Here is how to create a design that works:
Keep Text Large
Use text that is at least 0.25 inches tall. Smaller text becomes unreadable when stitched.
Use Fewer Colors
2–4 colors work best. Research in thread manufacturing shows that limited colors create cleaner stitches.
Avoid Thin Lines
Lines should be at least 1mm thick. Thin lines break easily during stitching.
Choose a Simple Shape
Round, square, and oval shapes are easier to cut and stitch.
Check Contrast
Light thread on dark fabric, or dark thread on light fabric, gives a clear look.
A clean, simple design also stitches 30–40% faster on both home and commercial embroidery machines.
Patch Backings Explained
The backing is what makes a patch easy to attach. Each backing has a different use.
1. Iron-On Backing
Best for everyday clothes. Heat activates the adhesive.
2. Sew-On Backing
Best for jackets, denim, and fabric that gets washed often.
3. Velcro Backing
Popular for military, tactical gear, and sports uniforms.
4. Adhesive Backing (Peel-and-Stick)
Used for events or temporary use. Not long-lasting.
5. No Backing
Used when you plan to sew directly onto clothes.
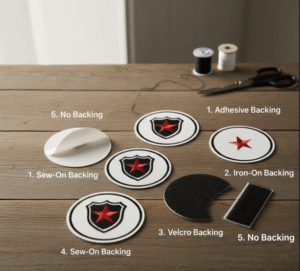
Choosing the right backing makes your patch stronger and more practical for its purpose.
Machine vs Hand Embroidery for Custom Patches
Many people get confused between machine and hand embroidery. Both work, but the results differ.

Hand Embroidery
- Good for small projects
- Takes more time
- More control over small details
- Cost-effective for beginners
Machine Embroidery
- Faster and cleaner
- Best for bulk orders
- More accurate stitching
- Gives a professional look
Data from embroidery shops shows that machines reduce stitching time by up to 80%. For business orders, machine embroidery is always the better option.
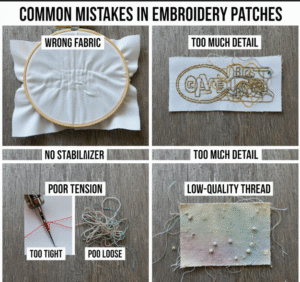
Common Mistakes People Make When Making Custom Embroidery Patches
Avoid these mistakes to save time and avoid frustration:
Using the Wrong Fabric
Thin fabric leads to poor stitch quality.
Skipping Stabilizer
This causes the design to stretch or look uneven.
Too Much Detail in the Design
Patches cannot show tiny details like printed images.
Wrong Thread Tension
If tension is too tight, thread breaks. If too loose, the design looks messy.
Poor Cutting Around the Border
Cut slowly to maintain a clean edge.
Using Low-Quality Thread
Cheap thread breaks often and loses color after washing.
Fixing these mistakes early improves the patch quality and saves hours of rework.
How to Attach Custom Embroidery Patches to Clothes
There are three common ways to attach patches.
1. Iron-On Method
- Place the patch on clothes
- Cover with a thin cloth
- Apply iron heat for 15–20 seconds
- Press firmly
Iron-on patches are best for cotton and denim.
2. Sewing Method
- Use needle and strong thread
- Stitch around the border
- Make small stitches for durability
Sewing works best for jackets, backpacks, and fabric that needs frequent washing.
3. Heat Press Method
- Used for bulk orders
- Provides long-lasting adhesion
- Keeps patch edges smooth
Most apparel factories prefer heat press because it gives consistent results.
How Much Does It Really Cost to Make Custom Embroidery Patches?
Cost depends on size, thread count, backing type, and quantity.
DIY Cost Breakdown
- Thread: low cost
- Fabric: low cost
- Stabilizer: low cost
- Tools (one-time purchase)
DIY is cheaper for small quantities but time-consuming.
Professional Production Cost
Average market prices
- 2-inch patch: $0.50–$2.00
- 3-inch patch: $1.00–$3.00
- 4-inch patch: $2.00–$4.00
Buying from a manufacturer is cost-effective if you need more than 20 patches.
Best Places to Order Custom Embroidery Patches
If you prefer ordering instead of making patches, here’s what you should look for:
1. Look for Free Digital Proof
This helps you check mistakes before production.
2. Ask for Thread Samples
This ensures the colors match what you need.
3. Check Minimum Order Quantity
Some companies require 50 pieces, others do not.
4. Read Delivery and Production Time
Standard turnaround is 7–12 days.
5. Compare Price Per Patch
Large orders give better discounts.
If you want consistent quality and quick service, a professional patch manufacturer is always the best choice.
Final Thoughts
Custom embroidery patches are simple to make once you understand the tools, steps, and mistakes to avoid. This guide gives you the full process in a clear and easy way so you can start your patch project without confusion.
Whether you create patches for yourself or for your business, keeping the design simple and following proper stitching methods will give you strong, long-lasting patches.