
Leather patch hats have become one of the most popular trends in custom headwear. From outdoor brands and small businesses to sports teams and fashion labels, many people choose leather patches on hats because they offer a premium, rugged, and timeless appearance.
The good news? Learning how to put leather patches on hats is not difficult when you use the right method and tools. Whether you want to create custom merchandise, personalize your favorite cap, or start a custom hat business, this guide covers everything you need to know.
Why Leather Patches Are Popular on Hats
Leather patches instantly elevate the appearance of a hat. Unlike printed graphics that can fade over time, leather develops character as it ages. Many brands prefer leather because it creates a professional and high-end look.
Leather patches also work well on different hat styles, including:
- Trucker hats
- Baseball caps
- Snapbacks
- Dad hats
- Outdoor and workwear caps
Another advantage is durability. Genuine leather and high-quality faux leather can handle daily wear when attached correctly.
Choosing the Right Leather Patch
Before attaching a patch, select the right material.
Genuine Leather
Genuine leather offers a natural texture and develops a unique patina over time. It often works best for premium products and luxury branding.
Faux Leather
Faux leather provides a similar appearance at a lower cost. Many manufacturers use laser-engraved faux leather patches because they produce sharp details and consistent results.
Patch Size Matters
Avoid choosing a patch that is too large for the hat panel. Most front hat patches range between 2 and 3 inches wide, depending on the design and cap style.
A properly sized patch looks balanced and sits comfortably on the hat.
3 Different Ways to Put Leather Patches on Hats
There is no single “best” method for every project. The right approach depends on the patch type, production volume, and desired durability.
1. Heat Press Method
The heat press method remains one of the most popular options for custom hat businesses because it produces clean and professional results. Industry guides consistently recommend heat pressing when working with adhesive-backed leather patches.
What You Need
- Leather patch with heat-activated adhesive
- Hat press or heat press machine
- Teflon sheet or parchment paper
- Hat
Step-by-Step Process
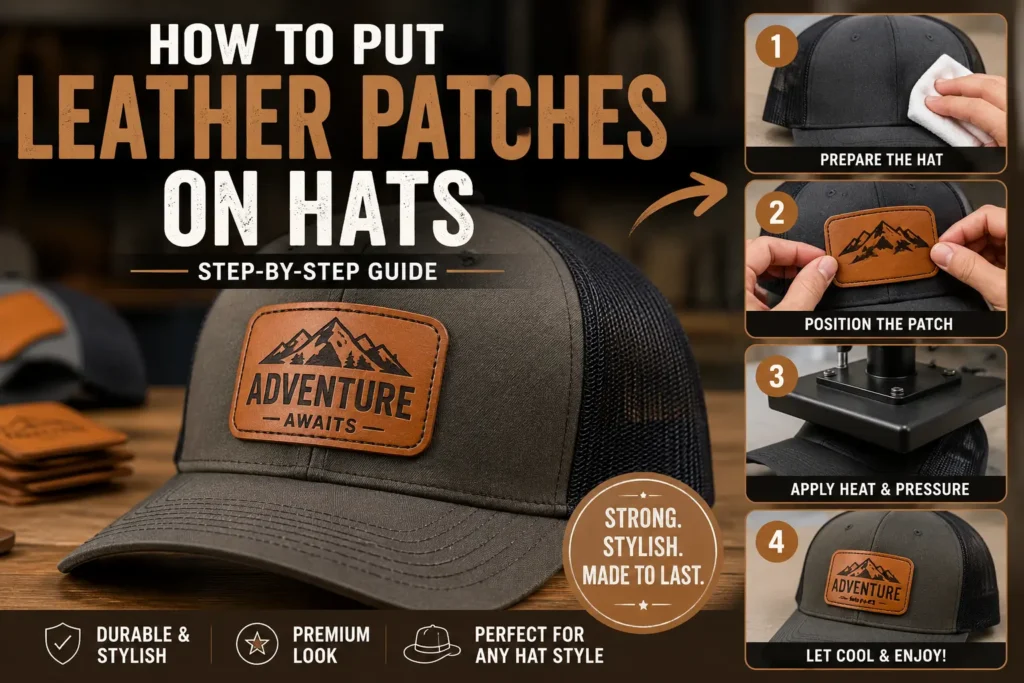
Step 1: Prepare the Hat
Remove dust, lint, and moisture from the hat surface. A clean surface helps create a stronger bond.
Step 2: Position the Patch
Place the leather patch exactly where you want it. Most people center the patch on the front panel.
Take a moment to double-check alignment. A crooked patch attracts attention for all the wrong reasons.
Step 3: Protect the Patch
Place parchment paper or a Teflon sheet over the patch. This helps protect the leather from direct heat exposure.
Step 4: Apply Heat and Pressure
Heat press settings vary depending on the patch material and adhesive. Many manufacturers recommend temperatures between approximately 270°F and 300°F with medium pressure for leather and leatherette patches.
Always follow the patch supplier’s instructions whenever available.
Step 5: Let It Cool
After pressing, allow the hat to cool completely before handling it. Cooling helps the adhesive bond properly.
Advantages of Heat Pressing
- Fast production
- Clean appearance
- Consistent placement
- Great for bulk orders
Things to Watch Out For
Too much heat can damage leather or leave marks on the patch. Community discussions among hat decorators often mention excessive pressure and heat as common causes of seam marks and discoloration.
2. Sewing Leather Patches on Hats
Many professionals consider sewing the most secure attachment method because stitches create a mechanical bond rather than relying solely on adhesive.
What You Need
- Leather patch
- Heavy-duty thread
- Leather needle
- Sewing machine or hand-sewing tools
Step-by-Step Process
- Position the patch on the hat.
- Secure it temporarily with clips or tape.
- Stitch around the outer edge.
- Maintain even spacing throughout the design.
- Trim loose threads after completion.
Advantages of Sewing
- Excellent durability
- Long-lasting attachment
- Professional handcrafted appearance
Drawback
Sewing takes more time than heat pressing, especially when producing large quantities.
3. Using Adhesive or Glue
Glue offers another option when heat pressing or sewing is not practical.
How to Apply
- Apply a thin, even layer of leather-friendly adhesive.
- Position the patch carefully.
- Press firmly.
- Allow the adhesive to cure according to the manufacturer’s instructions.
Many DIY users combine adhesive with stitching for extra security. This approach can improve long-term durability.
Advantages
- Simple process
- Minimal equipment required
- Suitable for small projects
Disadvantages
- Not always as durable as sewing
- Quality depends heavily on the adhesive used
Common Mistakes to Avoid
Using Too Much Heat
Leather reacts poorly to excessive temperatures. Always test settings before production runs.
Ignoring Hat Curvature
Hats are curved surfaces, not flat canvases. If the patch does not conform to the shape of the hat, edges may lift over time. Some professionals recommend pre-shaping patches slightly before application.
Poor Alignment
Measure twice and press once.
Nobody wants a premium leather patch that looks like it was attached during a bumpy car ride.
Skipping Cooling Time
Many beginners rush the process. Allowing the patch to cool helps improve adhesion and overall finish.
Which Method Is Best?
The answer depends on your goals.
| Method | Durability | Speed | Best For |
|---|---|---|---|
| Heat Press | High | Fast | Bulk production |
| Sewing | Very High | Slow | Premium and long-term use |
| Glue | Moderate | Fast | DIY and small projects |
For most custom hat businesses, heat pressing offers the best balance between speed and appearance. For maximum durability, sewing remains the strongest option.
Final Thoughts
Knowing how to put leather patches on hats can help you create stylish, professional-looking headwear for personal use or commercial production.
The three main methods—heat pressing, sewing, and gluing each offer unique advantages. Heat pressing delivers speed and consistency, sewing provides unmatched durability, and adhesive works well for simple DIY projects.
No matter which method you choose, focus on proper placement, quality materials, and careful application. A well-attached leather patch can transform an ordinary hat into a product that looks premium, lasts longer, and attracts attention for the right reasons.
When done correctly, the result is simple: a hat that looks less “off-the-shelf” and more “where did you get that?”