
Chenille patches have become one of the most popular patch styles in fashion, sports apparel, school letterman jackets, and brand merchandise. Their soft, fuzzy texture creates a bold look that instantly stands out.
If you’ve ever wondered how to make chenille patches, this guide walks you through the complete process, from design creation to the final patch. Whether you’re a clothing brand, school, sports team, or business owner, understanding the manufacturing process helps you create better custom patches that look professional and last for years.
What Are Chenille Patches?
Chenille patches are decorative patches made using thick yarn loops stitched onto a felt backing. The word “chenille” comes from the French word for caterpillar because the yarn’s fuzzy texture resembles a caterpillar’s appearance.
These patches became famous through varsity jackets and letterman apparel. Today, brands, schools, sports teams, and fashion companies use custom chenille patches to create eye-catching designs with a vintage look. Premium Quality Patches manufactures custom chenille patches for apparel brands, schools, teams, and businesses worldwide.
How We Make Chenille Patches at Premium Quality Patches
At Premium Quality Patches, we follow a precise, professional production process to ensure every chenille patch looks premium, lasts long, and matches your design perfectly.
We don’t just make patches — we build brand identity through quality craftsmanship.
Materials Used in Our Chenille Patch Production
Professional chenille patch manufacturing requires the right combination of materials and equipment.
We carefully select every component to ensure durability, texture, and visual appeal.
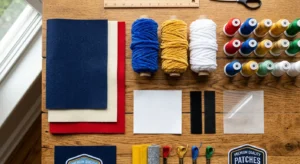
1. Felt Backing
Felt acts as the foundation of every chenille patch.
It provides structure, stability, and supports the raised chenille yarn so the design holds its shape properly.
2. Chenille Yarn
This is the heart of the patch.
The soft, looped yarn creates the signature fuzzy texture that makes chenille patches bold, stylish, and highly visible.
3. Embroidery Thread
We use embroidery thread to add fine details, outlines, and small elements that chenille alone cannot achieve.
This combination gives a balanced mix of texture and precision.
4. Backing Materials
We offer multiple backing options based on usage and application needs:
- Sew-on backing
- Iron-on backing
- Velcro backing
- Peel-and-stick backing
Each backing is selected based on the client’s purpose, whether it’s fashion, uniforms, or promotional use.
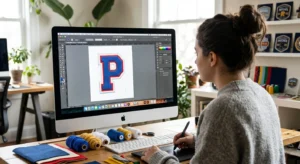
Step 1: Design Creation
Every chenille patch starts with a strong design.
Our design team works on digital artwork using vector-based tools to ensure clean scaling and precision.
During this stage, we finalize:
- Patch size
- Color selection
- Shape and layout
- Lettering style
- Border preference
We always recommend bold and simple designs because chenille works best with strong visual impact.
That’s why varsity letters, logos, and school emblems remain the most popular choices.
Step 2: Digitizing the Design
Once the design is approved, we convert it into a machine-ready format.
This process is called digitizing.
Our digitizers define:
- Yarn placement areas
- Stitch directions
- Color sequencing
- Border mapping
- Embroidery detailing
Proper digitizing ensures accuracy in every single patch.
A poorly digitized file can ruin even the best design — so we treat this step with extra attention.
Step 3: Preparing the Felt Base
We place high-quality felt onto industrial chenille embroidery machines.
The fabric is tightly hooped to keep it stable during production.
This prevents shifting and ensures:
- Clean edges
- Accurate alignment
- Consistent stitching
A stable base is essential for professional chenille patch quality.
Step 4: Stitching the Chenille Yarn
This is where the magic happens.
Our machines loop chenille yarn repeatedly into the felt, forming dense, soft, raised textures.
The process builds the iconic fuzzy surface that defines chenille patches.
We use this method to create:
- School initials
- Sports team logos
- Mascots
- Brand symbols
- Custom artwork
Each stitch follows the digitized pattern with precision to maintain uniform quality across production.
Step 5: Adding Embroidery Details
We often combine chenille with embroidery to enhance clarity and detail.
Embroidery is used for:
- Small text
- Fine outlines
- Logo detailing
- Borders
- Accent elements
This combination gives a premium, high-definition finish while keeping the classic chenille texture intact.
At Premium Quality Patches, this hybrid style is one of our most requested options.
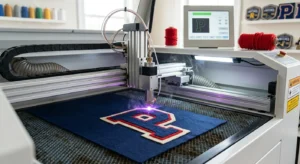
Step 6: Cutting the Patch Shape
After stitching is complete, we cut the patch into its final shape.
We use different cutting methods depending on design requirements:
1. Laser Cutting
Provides clean, precise edges for complex or custom shapes.
2. Die Cutting
Ideal for bulk production with consistent and uniform designs.
3. Hand Trimming
Used for special or highly detailed custom projects.
We choose the method based on design complexity and order size.
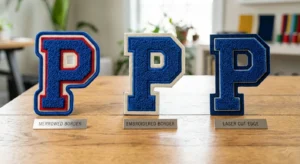
Step 7: Applying the Border
Borders are important for both strength and appearance.
We offer multiple border styles:
1. Merrowed Border
A thick stitched edge commonly used for traditional chenille patches.
2. Embroidered Border
A clean and flexible stitched border suitable for custom shapes.
3. Laser-Cut Edge
A modern, sharp finish for highly detailed designs.
Each border style is selected based on durability needs and design style.
Step 8: Attaching the Backing
The final step is applying the backing that fits your use case.
We offer several professional options:
| Backing Type | Best Use |
|---|---|
| Sew-On | Jackets, uniforms, long-term use |
| Iron-On | Easy application on apparel |
| Velcro | Military gear, tactical use, removable patches |
| Peel-and-Stick | Events, short-term promotions |
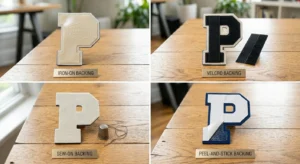
We always guide our customers in selecting the best backing to ensure maximum usability and durability.
Quality Control and Final Inspection
Professional manufacturers inspect every patch before shipping.
The quality control process checks:
- Stitch quality
- Yarn consistency
- Color accuracy
- Border finishing
- Backing adhesion
This step helps ensure customers receive patches that match their approved artwork.
At Premium Quality Patches, every order goes through an inspection process before production completion.
DIY vs Professional Chenille Patch Manufacturing
Many people attempt to make chenille patches at home. While small projects are possible, professional manufacturing offers several advantages:
- Better consistency
- Industrial-grade materials
- Professional digitizing
- Precise cutting
- Faster production
- Higher durability
Commercial chenille machines also create cleaner loop structures that home equipment cannot easily replicate.
For clothing brands, schools, sports teams, and businesses, professional manufacturing usually delivers the best results.
Why Choose Premium Quality Patches?
Premium Quality Patches has over 15 years of experience producing custom patches and promotional products. The company manufactures:
- Custom Embroidery Patches
- Custom Chenille Patches
- PVC Patches
- Silicone Patches
- Woven Patches
- Leather Patches
- Metflex Patches
- Custom Keychains
- Enamel Pins
- Challenge Coins
The company handles production in-house and provides design support, flexible order quantities, and multiple backing options.
Conclusion
Learning how to make chenille patches helps you understand why these patches continue to dominate varsity apparel, fashion brands, and promotional merchandise.
The process involves designing, digitizing, stitching chenille yarn, adding embroidery details, cutting, bordering, and applying the right backing. Each step plays a crucial role in creating a patch that looks great and lasts.
If you want professionally manufactured chenille patches with premium materials and expert craftsmanship, Premium Quality Patches can help bring your design to life.
Ready to Create Your Custom Chenille Patches?
Whether you need varsity letters, school patches, team logos, or branded merchandise, our team can turn your artwork into high-quality chenille patches with fast turnaround times.
Explore our Custom Chenille Patches.
You can also discover our other products, including Custom Embroidery Patches, PVC Patches, Silicone Patches, Woven Patches, Leather Patches, Metflex Patches, Custom Keychains, Enamel Pins, and Challenge Coins.